Elecbrakes Help Centre
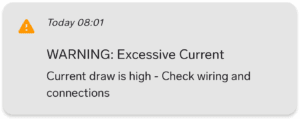
Trigger:
Current draw on Input or Output is greater than 24Amps.
Possible causes:
● High settings on a triple axle or larger trailer.
● Soft short circuit on the service brake circuit (magnets).
Next step:
● Check settings, wiring and connections, visit trailer repairer if necessary.

Trigger:
Short circuit condition is triggered on the brake controller when the output current exceeds 28Amps.
Cause:
Short circuit detection is specific to the service brake circuit on the trailer, when the brake controller is attempting to provide an output to the service brake (blue wire – pin 5).
This is most likely an external issue to the Elecbrakes brake controller, related to the blue wire (magnet wiring) shorting to ground.
Next step:
● Visit a trailer repairer and test service brake circuit (magnets) for a short circuit or earthing fault.
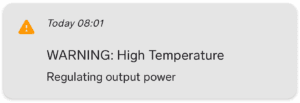
Trigger:
The measured brake controller board temperature is between 80ºC and 150ºC.
Possible causes:
● Override left on – check override status (override icon should not be red).
● High continuous current draw from high settings.
● Soft short circuit on the service brake circuit (magnets).
Next step:
● Check settings, wiring and connections, visit trailer repairer if necessary.
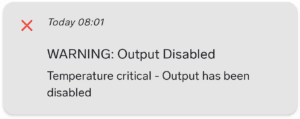
Trigger:
The measured brake controller board temperature has exceeded 145ºC.
The Temperature Critical detection is related to a high draw for a longer period of time, likely linked with a preceding Short Circuit Error – still possible short circuit that has been left not inspected or repaired.
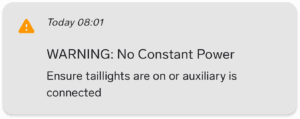
Triggers:
● The brake controller does not have >10V on either Taillight circuit or Auxiliary circuit.
● Brake controller only powered via Brake light circuit when brake pedal applied.
Possible causes:
● Headlights / Taillights not On or are set to Auto-DRL.
● Vehicle voltage sag or cut on taillight or auxiliary circuit during engine start / starter cranking.
● Wiring issue causing taillights or auxiliary to drop out.
● Trailer wiring module in the tow vehicle cutting power to tail light circuit.

The brake controller registers Input voltages below 9V for more than 5 seconds.
Note: this warning could be triggered by low vehicle battery voltage – if the tow vehicle battery has a problem such as a low state of charge, address that issue before pursuing fault diagnosis with the brake controller.
Elecbrakes brake controllers require a functional voltage (10V and above) on either Taillight circuit or Auxiliary circuit.
Trigger for EB2:
● Vehicle outputting a low voltage or low voltage PWM based voltage typically measured between 4V and 9V.
Next Step EB2:
● Depending on the tow vehicle, adding load resistors to the trailer lighting circuits on the trailer may assist the vehicle to detect the trailer and switch the output to a 12V DC.
● Alternately – provide a dedicated Auxiliary power source to the brake controller via the black wire.
Trigger for VM1:
● No Auxiliary power source, only pairing when brake pedal pressed (power to brake light circuit). NOTE: Voltage displayed on brake or tail light voltage readout on data page in this scenario is not accurate.
Next Step VM1:
● Confirm Auxiliary power provided via the black wire. Must be dedicated 25A rated feed (not jumped over from tail light). Must be able to measure 12V DC between the black wire and white wire at the Deutsch plug.
1) Disconnect from other devices:
Elecbrakes EB2 and ELBC brake controllers will only connect via Bluetooth to one device at a time. You must ensure other previously connected devices are disconnected in order to pair a new device. This includes the Elecbrakes remote (sold separately).
To disconnect other devices, you can force close the Elecbrakes App on those devices or alternately within the App go to > Devices tab > deselect the brake controller from the device list icon to the left of the device name, to disconnect.
2) Brake function and power check – With Tow Vehicle and Trailer Hitched:
● Disconnect and reconnect both trailer plugs and deutsch connector, then cycle the ignition and lights to the ON position (not auto or daytime running lights).
● Check that tail & brake lights on the trailer and car are working, and that pressing the brake pedal causes the brake lights to come on (no burnt or dull globes).
● Have a helper press the brake pedal to check for brake function/output – A buzzing sound should be present at the trailer hubs indicating that the brakes are working.
Note – you do not need to be connected to the brake controller via Bluetooth, in order for the trailer brakes to function.
If the tow vehicle tail lights, trailer lights or trailer brake function are not working, inspect the adaptor and trailer plugs. Clean the terminals and splay the pins as needed to ensure a secure and positive connection when engaged. Please see “Input Power Circuit Test” as required.
3) Pairing via Elecbrakes App:
● If you are having trouble connecting to your brake controller using the Elecbrakes App, first try power cycling your brake controller by unplugging the deutsch plug and plugging it back in – listen for the “click” when the deutsch plug engages the power socket on the brake controller.
● Remove any previously saved Elecbrakes EB2 or VM1 entries from your Bluetooth pairing list on your smartphone, and then restart your phone.
● Confirm that there are no outstanding software updates due for the phone and complete this update first if necessary + restart device to proceed.
● Uninstall and reinstall the Elecbrakes app on your phone to ensure the latest version is in use.
● Keeping your foot on the brake, re-start the vehicle, this time keeping your foot on the brake pedal.
● Re-start the app on your phone and re-attempt to connect to the brake controller.
If you reach the final step when holding your foot on the brake pedal and connecting to the device and you find when releasing the brake pedal that the Bluetooth disconnects, further investigation of the Tail light / Auxiliary power supply is required. Please contact us for further guidance.
Lastly, if you are unable to establish pairing after confirming the above steps, please call or email for us to progress this to a ticket for further assistance:
[email protected] or 1300 516 248
Office Hours: Mon-Fri 8:30am-4:30pm (AEST).
1) Disconnect from other devices:
Elecbrakes VM1 will only connect via Bluetooth to one device at a time. You must ensure other previously connected devices are disconnected in order to pair a new device. This includes the Elecbrakes remote (sold separately).
To disconnect from other devices, you can either force close the Elecbrakes App on those devices or alternately within the App go to > Device tab > deselect the brake controller from the device list by pressing the icon to the left of the device name, to disconnect.
2) Brake function and power check – With Tow vehicle and Trailer hitched:
● Disconnect and reconnect both trailer plugs and VM1 deutsch connector, then, cycle the ignition and lights to the on position (not auto or daytime running lights).
● Check that tail & brake lights on the trailer and car are working, and that pressing the brake pedal causes the brake lights to come on (no burnt or dull globes).
● Have a helper press the brake pedal to check for brake function/output – a buzzing sound should be present at the trailer hubs indicating that the brakes are working.
● For VM1, electrical power to drive the brakes is supplied by the Auxiliary input (black wire). However, VM1 requires voltage on the brake light circuit (red wire) to wake up. The device can also be powered by the tail light circuit for pairing only – but it will not drive the brakes unless Auxiliary is connected and is at minimum, 10V.
Note – you do not need to be connected to the brake controller via Bluetooth, in order for the trailer brakes to function.
If the tow vehicle, trailer lights or brake function are not working, inspect the adaptor and trailer plugs. Clean the terminals and splay the pins as needed to ensure a secure and positive connection when engaged. Please see “Input Power Circuit Test” as required.
3) Pairing via Elecbrakes App:
● If you are having trouble connecting to your brake controller using the Elecbrakes App, first try power cycling your brake controller by unplugging the deutsch plug and plugging it back in – listen for the “click” when the deutsch plug engages the power socket on the brake controller.
● Remove any previously saved Elecbrakes EB2 or VM1 entries from your Bluetooth pairing list on your smartphone, and then restart your phone.
● Confirm that there are no outstanding software updates due for the phone and complete this update first if necessary + restart device to proceed.
● Uninstall and reinstall the Elecbrakes app on your phone to ensure the latest version is in use.
● Keeping your foot on the brake, re-start the vehicle, this time keeping your foot on the brake pedal.
● Re-start the app on your phone and re-attempt to connect to the brake controller.
If you reach the final step when holding your foot on the brake pedal and connecting to the device and you find when releasing the brake pedal that the Bluetooth disconnects, further investigation of the Tail light / Auxiliary power supply is required. Please contact us for further guidance.
Lastly, if you are unable to establish pairing after confirming the above steps, please call or email for us to progress this to a ticket for further assistance:
[email protected] or 1300 516 248.
Office Hours: Mon-Fri 8:30am-4:30pm (AEST).
With access to a multimeter, see below test and pinout guide to confirm voltages present to the brake controllers small square Deutsch plug.
If the voltages present are fluctuating below 10V, the brake controller cannot function as intended.
Further investigation by an auto electrician or repairer may be required to resolve.
Ensure the vehicle’s ignition + headlights are turned On:
Tail light circuit – Probe Earth (white wire) and Tail light (brown wire) = V
Brake light circuit with pedal applied – Probe Earth (white) and Brake light (red wire) = V

With access to a multimeter, see below test and pinout guide to confirm voltages present to the brake controllers small square Deutsch plug.
If the voltages present are fluctuating below 10V, the brake controller cannot function as intended.
Further investigation by an auto electrician or repairer may be required to resolve.
Ensure the vehicle’s ignition:
Auxiliary circuit – Probe Earth (white wire) and Auxiliary (black wire) + V
Brake light circuit with pedal applied – Probe Earth (white) and Brake light (red wire) = V
SwayControl settings can be adjusted to better suit your trailer setup and driving conditions, or disabled entirely if required.
● In some usage scenarios such as extreme off road driving or with certain trailer types including unladen plant or equipment trailers, car carriers, or empty boat trailers, SwayControl may be overactive or unnecessary.
● You can turn SwayControl ON or OFF by pressing and holding the SwayControl icon on the app homepage. This can also be adjusted within the Program Settings page for each user defined program.
Watch the below video on the new SwayControl app features:
● We recommend enabling GPS in the app. This can be done during SwayControl onboarding or via the Settings tab.
● When GPS is enabled, SwayControl will only arm above 60 km/h and automatically disarm below 50 km/h, helping prevent the brakes from activating during low speed driving manoeuvres such as roundabouts, tight corners, or off road driving.
● The SwayControl sensitivity setting allows you to control how responsive the system is to detecting sway. Sensitivity can be adjusted by tapping the orange SwayControl icon and moving the slider between Low and High.
● If SwayControl appears overactive, ensure the brake controller has been installed in line with the recommended guidelines specifically within 1 metre of the towball.
Proudly Designed and Made on the Central Coast
At Elecbrakes, being “Australian made” is more than just a label—it’s a commitment. Based on the Central Coast, we design and manufacture our brake controllers locally, ensuring each unit meets the highest standards of quality and durability. Built to withstand Australia’s toughest road conditions, both the EB2 and VM1 represent our dedication to innovative, reliable towing solutions you can trust.